LogoLogo
  • Introducing Tebex
    • Why Tebex?
  • Pricing
    • Starter & Plus Plans
    • Fees Overview
      • Why We Charge a Platform Fee
  • Initial Setup
    • General checklist for setting up a Tebex store
    • Identity Verification for Tebex Store Onboarding
    • Your Store Review
    • Tips for getting your store application approved
    • What is Intellectual Property?
    • Adult Content Guidelines
  • Tebex Control Panel
    • Dashboard
    • Payments
      • Manual Payments
      • Recurring Payments
      • Payment Methods
      • Checkout Settings
      • Fraud Analysis
      • Wallet
      • Payment Exports
    • Packages
      • How To Create A Package
      • How To Create A Category
      • How To Test A Package
      • Cumulative Packages
      • Downloadable Packages
      • Product Best Practice
    • Statistics
    • Customers
      • Customer Lookup
      • Banning
    • Webstore
      • Tebex Footer
      • Appearance
        • Custom CSS & HTML
        • Visibility
      • Sidebar Modules
      • Pages
      • Variables
        • Template Variables
      • Currency
        • Regional Pricing
      • Translations
        • Language
        • Custom Translations
      • Emails
      • Domains
        • Subdomain & Custom Domain
      • Notifications
        • Slack & Discord Notifications
    • Engagement
      • Coupon Codes
      • Sales
      • Creator Codes
      • Gift Cards
      • Community Goals
      • Abandoned Basket Recovery
      • Purchase Follow Ups
      • Upselling
      • Offers
    • Game Servers
      • FiveM
        • FiveM (Server Wrapper)
      • Minecraft: Java Edition
        • BuycraftX
      • ARK: Survival Evolved
      • Minecraft: Bedrock Edition
      • Space Engineers
        • Space Engineers Item IDs
        • How the Legacy Space Engineers Vanilla Integration Works
        • Mod Guidelines and FAQs
      • Unturned
      • Rust
      • Garry's Mod
      • Hurtworld
      • Counter Strike: GO
      • 7 Days To Die
      • Team Fortress 2
      • Conan Exiles
      • RCON (Legacy)
      • RCON Adapter
      • MySQL Depreciation
      • Product Deliverables Configuration
    • Discord Servers
    • Store Transfers
    • Team Accounts
    • Billing
      • Store Cancellation
  • Tebex Checkout
    • How Payments Work
    • Seller Protection and Chargebacks
    • Where and Why We Charge Sales Tax/VAT
      • Information for Accountants
    • Checkout Process
    • Paysafecard
    • Wallet
    • Wallet Restrictions - Deposits & Locks
    • Fund Withdrawals and Transfers
      • PayPal Withdrawal Fees
      • Bank Account Withdrawal Fees
      • Wire Transfer List of Countries & Fees
    • Checkout FAQ
    • Seller Support Guidance
    • Checkout Seller Actions
      • Changing Usernames
      • Changing Discord ID's
      • Resending Commands
      • Customer Lookup
      • Checkout Bans
    • Tebex Checkout for WHMCS
  • Subscribe @ Tebex Academy
  • Developer Documentation
  • FAQs
  • Growth and Success
    • 🛒Tebex Store Best Practices
    • 📆Sales Calendar - 2025
    • 🎁Gift Cards
    • 💬Community Engagement
    • ❓Frequently asked questions
    • 🚗FiveM Best Practices for Packages
    • 🥼FiveM Beta Assets Best practices
    • 📖Creator Success: Case Studies
      • 🚛Reducing Support Backlog through Restructuring the Team
      • 🔁Improving User Retention via “Loss Leader”
      • 📅Subscription Stability and Growth
  • Command Management
    • An Introduction To Commands
    • Command Troubleshooting
    • Resending Commands
    • Support for Epic Game IDs
Powered by GitBook
On this page
  • Changing Your Subdomain
  • What If The Subdomain I Want To Use Is Taken?
  • Can I Lose My Subdomain?
  • Why Can't I Use a Buycraft Subdomain?
  • Custom Domain Help Video
  • Using A Custom Domain Name
  • Configuring Your Custom Domain In The Tebex Control Panel
  • Creating The DNS Record On Your Domain Name
  • How To Create The DNS Record Within CloudFlare DNS
  • Cloudflare CNAME Cross-User Banned Error
  • How To Create The DNS Record Within Namecheap
  • How To Create The DNS Record Within Godaddy
  • How To Create The DNS Record Within Domain.com
  • How To Create The DNS Record Within Hostgator
  • How To Create The DNS Record Within Bluehost
  • How To Create The DNS Record Within Dreamhost

Was this helpful?

  1. Tebex Control Panel
  2. Webstore
  3. Domains

Subdomain & Custom Domain

PreviousDomainsNextNotifications

Last updated 3 months ago

Was this helpful?

Please note that you will need to be on a Tebex to use a custom domain and letting your Plus Plan Expire will cause your Custom Domain to no longer work.

When you first create a webstore it will be accessible from a . subdomain. For example your webstore address might look like .

Changing Your Subdomain

  1. Go to Webstore > Domain.

  2. Enter your Subdomain in the subdomain configuration box.

  3. Click Save.

What If The Subdomain I Want To Use Is Taken?

We cannot service requests to manually 'free-up' or 'make available' a Tebex subdomain. We make inactive subdomains available again periodically - this happens automatically. We can only advise that you use a custom domain of your own, or use another Tebex subdomain.

Can I Lose My Subdomain?

If your store is inactive, and by this we mean your store has not taken a single payment in a period of 1 year, your subdomain may be claimed by another store. If this occurs, unfortunately, you cannot claim this subdomain back, and you must use an alternative. Please note, that this only occurs on stores on the free plan. Stores on a paid plan, cannot have their subdomain claimed due to inactivity.

Why Can't I Use a Buycraft Subdomain?

We changed our company name and branding some years ago, and while we're often still known by people as Buycraft, this is no longer our branding. New stores will be set to the tebex.io subdomain, and we cannot change this to Buycraft upon request, so please do not request this of us.

Custom Domain Help Video

Watch our YouTube video for a step-by-step guide on how to set up your custom domain.

Using A Custom Domain Name

Configuring Your Custom Domain In The Tebex Control Panel

  1. Go to Webstore > Domain.

  2. Click Setup in the domain configuration box.

  3. Copy the DNS record provided (it will be in the format of xxxxxxx.webstore.tebex.io) and save this for later.

  4. Create a CNAME record of your custom domain pointing to the previously copied DNS record from above. Please see below for help on how to create this CNAME record and do not proceed with the next step until you've created your CNAME record.

  5. Click Setup.

Creating The DNS Record On Your Domain Name

In the previous setup steps you have told Tebex Store which custom domain you would like to use. You now need to create the DNS records within your domain name to link it to the Tebex Platform. Below are multiple examples on how to do this with popular domain registrars, but the instructions should remain similar if you are using an alternative DNS provider. If you are confused at how to create DNS records for your domain name you should contact your domain registrar for more information.

How To Create The DNS Record Within CloudFlare DNS

  1. Login to CloudFlare

  2. Go to the DNS tab and scroll down to your DNS records.

  3. In the box where you can add a new record, select CNAME from the dropdown list on the left. Then, in the name field, enter store (or whatever the first part of your custom domain is).

  4. In the next field labeled Domain Name enter your provided DNS record when setting up your custom domain name (it will be in the format of xxxxxx.webstore.tebex.io)

  5. Disable the orange cloud - it is very important you do this.

  6. Click Add Record.

  7. Wait a few minutes and attempt to access your store with your newly created custom domain name. If you can access your store, everything is setup!

An example of how it should look in CloudFlare is listed in the image below:​

We highly recommend disabling CNAME flattening as this can cause issues with the custom domain checker not being able to find your custom domain.

Cloudflare CNAME Cross-User Banned Error

If you're using Cloudflare as your domain registrar / DNS provider, you could run into an issue that looks a little something like below:

This could be caused by a few different reasons:

  • Your Tebex Plus Plan has expired, even if temporarily, and your custom domain was disabled.

You can resolve this by:

  1. Fully remove any Tebex-Store related DNS entries from your Cloudflare Control Panel and wait 10 minutes for propagation.

How To Create The DNS Record Within Namecheap

  1. Login to Namecheap.

  2. Go to the Domain List from the sidebar panel.

  3. Click Manage on the domain you wish to edit.

  4. Click the Advanced DNS tab.

  5. Click Add New Record and select CNAME Record within the Type dropdown.

  6. In the Host field enter store (or whatever the first part of your custom domain is).

  7. In the Value field enter your provided DNS record when setting up your custom domain name (it will be in the format of xxxxxx.webstore.tebex.io).

  8. Click Add New Record.

  9. Wait a few minutes and attempt to access your store with your newly created custom domain name. If you can access your store, everything is setup!

An example of how it should look in Namecheap is listed in the image below:​

How To Create The DNS Record Within Godaddy

  1. Login to your GoDaddy Domain Portfolio.

  2. Select the Domain you wish to edit.

  3. Select the DNS & DNS Records Tab.

  4. Click Add New Record and select CNAME Record within the Type menu.

  5. In the Host field enter store (or whatever the first part of your custom domain is).

  6. In the Value field enter your provided DNS record when setting up your custom domain name (it will be in the format of xxxxxx.webstore.tebex.io).

  7. Select Save to add your new CNAME Record.

  8. Wait a few minutes and attempt to access your store with your newly created custom domain name. If you can access your store, everything is setup!

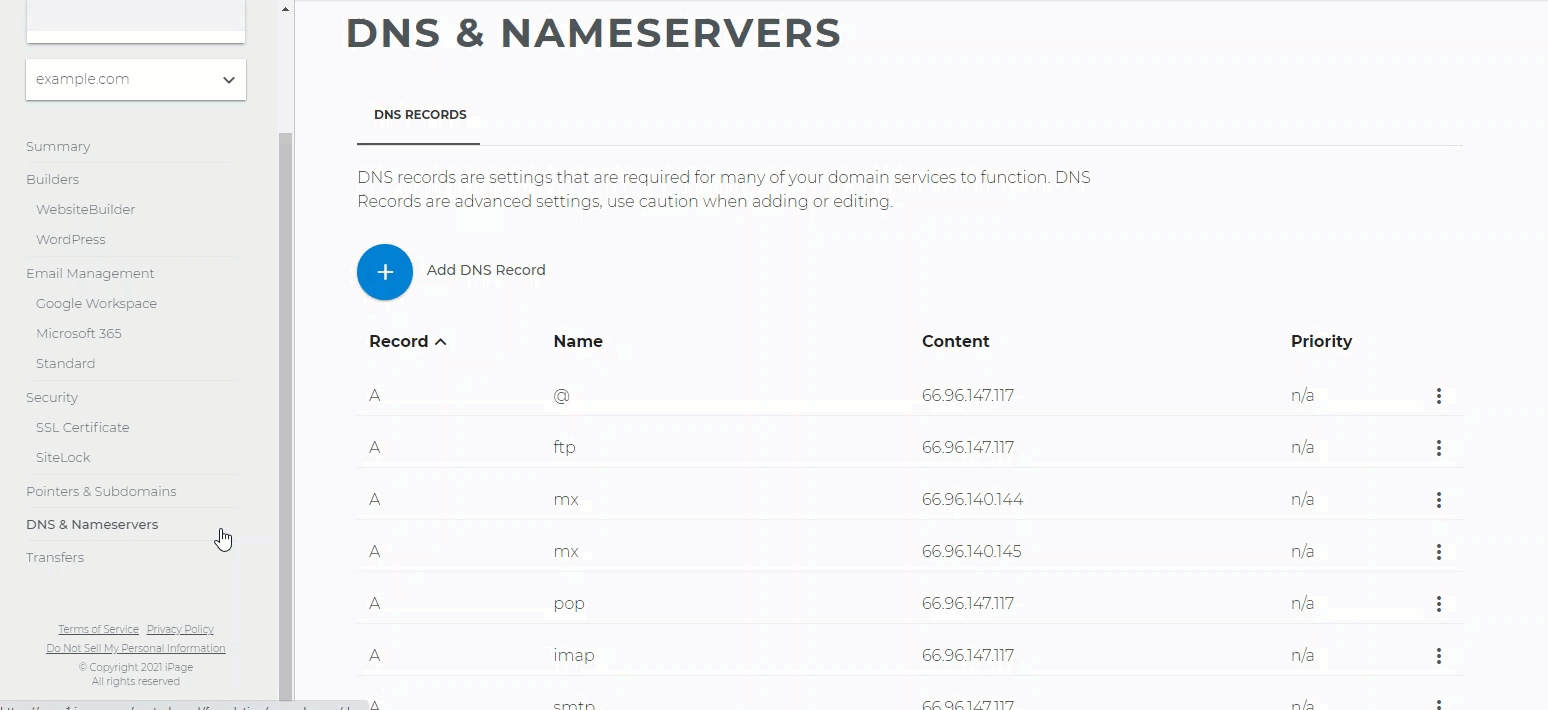
How To Create The DNS Record Within Domain.com

  1. Login to your Domain.com Dashboard.

  2. Select the Domain you wish to edit and click Manage.

  3. On the left sidebar, click on DNS & Nameservers.

  4. On the DNS & Nameservers page, select the DNS Records tab.

  5. Click the blue + button icon that says Add DNS Record.

  6. In the Name field enter store (or whatever the first part of your custom domain is).

  7. In the Type field select CNAME from the dropdown menu.

  8. In the Content field enter your provided DNS record when setting up your custom domain name (it will be in the format of xxxxxx.webstore.tebex.io).

  9. Click Add DNS.

  10. Wait a few minutes and attempt to access your store with your newly created custom domain name. If you can access your store, everything is setup!

How To Create The DNS Record Within Hostgator

  1. Login to your Hostgator cPanel.

  2. Locate the Domains section, then click Zone Editor.

  3. Select the Domain you wish to edit and the + CNAME Record button.

  4. In the Name field enter store (or whatever the first part of your custom domain is).

  5. In the CNAME field enter your provided DNS record when setting up your custom domain name (it will be in the format of xxxxxx.webstore.tebex.io).

  6. Click Add A CNAME Record Button.

  7. Wait a few minutes and attempt to access your store with your newly created custom domain name. If you can access your store, everything is setup!

How To Create The DNS Record Within Bluehost

  1. Log into your Bluehost Account.

  2. Click the Domains tab, then click Zone Editor.

  3. Select the Domain you wish to edit from the drop-down box.

  4. Click Add DNS Record.

  5. In the Host field enter store (or whatever the first part of your custom domain is).

  6. Select CNAME Record within the Type dropdown menu.

  7. In the Points To field enter your provided DNS record when setting up your custom domain name (it will be in the format of xxxxxx.webstore.tebex.io).

  8. Click Add Record Button.

  9. Wait a few minutes and attempt to access your store with your newly created custom domain name. If you can access your store, everything is setup!

How To Create The DNS Record Within Dreamhost

  1. Log into your Dreamhost Account.

  2. Locate the Manage Websites section.

  3. On the domain you wish to edit, click the 'vertical 3 dots' button and select DNS Settings.

  4. Click Add Record Button.

  5. In the Host field enter store (or whatever the first part of your custom domain is).

  6. In the Points To field enter your provided DNS record when setting up your custom domain name (it will be in the format of xxxxxx.webstore.tebex.io).

  7. Click Add Record button to save.

  8. Wait a few minutes and attempt to access your store with your newly created custom domain name. If you can access your store, everything is setup!

If you'd like to use your own domain name such as you can read our helpful guide below to get started. Please ensure that you own a domain name before starting this guide, if you do not own a domain name you can purchase one from a domain registrar such as or .

In the popup you should enter the custom domain that you'd like to use, for example

For more information regarding

Your DNS Settings are not set correctly ( regarding setting up DNS with Cloudflare for your Tebex Store).

Fixing any Plus Plan billing issues (including by re-subscribing to Tebex Plus, if you need to) here on our

Fully

Re-add the relevant DNS entries to your Cloudflare Control Panel and wait another 10 minutes for propagation;

If you're still having issues after having run through these steps, please

Plus Plan
tebex.io
http://example.tebex.io
store.example.com
GoDaddy
Namecheap
store.example.com.
CNAME Flattening
Billing Page.
remove your custom domain name from the Control Panel, here.
contact Creator Support.
please see above instructions
you'll find the instructions above.